Unity Attributes for Better Inspector Experience


Roguesphere
Shove foes and conquer worlds with one finger.
The whole universe is against you, but you fight anyway. Travel around planets, smash through anything in your way, and get back up no matter what.
Hello! Let's build on the following simple Unity script and improve the inspector experience for it by adding in attributes.
using UnityEngine;

public class ExampleScript : MonoBehaviour
{
    private float damageDealt = 5;
    private int currentHealth = 50;
    public int maxHealth = 100;
    private string characterName = "Unity";
    private string characterDescription = "Unity Attributes";
}
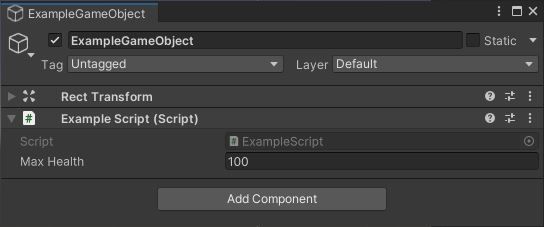
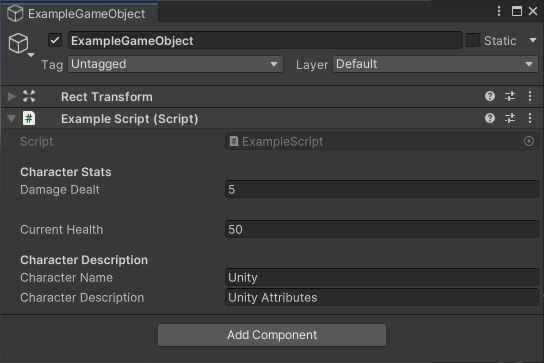
In the inspector view, it looks like this:
//SerializeField
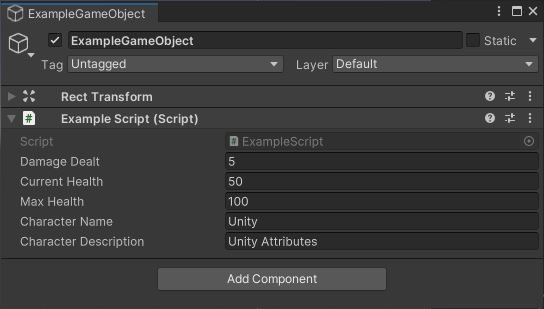
To expose private variables in the inspector so that you could change it, simply add the SerializeField attribute.
using UnityEngine;

public class ExampleScript : MonoBehaviour
{
    [SerializeField] private float damageDealt = 5;
    [SerializeField] private int currentHealth = 50;
    public int maxHealth = 100;
    [SerializeField] private string characterName = "Unity";
    [SerializeField] private string characterDescription = "Unity Attributes";
}
//HideInInspector
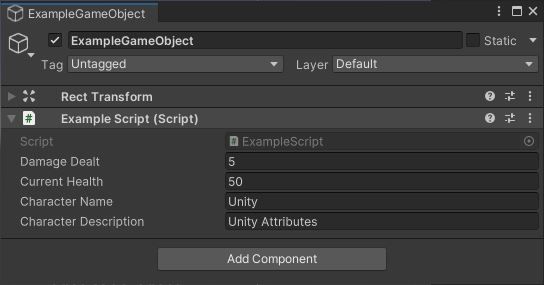
To do the opposite and hide public variables from the inspector, simply add the HideInInspector attribute.
using UnityEngine;

public class ExampleScript : MonoBehaviour
{
    [SerializeField] private float damageDealt = 5;
    [SerializeField] private int currentHealth = 50;
    [HideInInspector] public int maxHealth = 100;
    [SerializeField] private string characterName = "Unity";
    [SerializeField] private string characterDescription = "Unity Attributes";
}
//Header
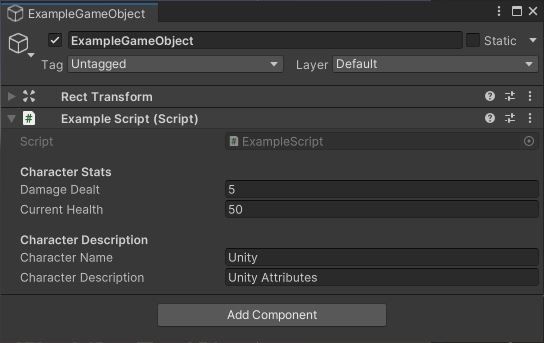
Now, let's organize things a bit by adding in labels above the variables in the inspector by using the Header attribute.
using UnityEngine;

public class ExampleScript : MonoBehaviour
{
    [Header("Character Stats")]
    [SerializeField] private float damageDealt = 5;

    [SerializeField] private int currentHealth = 50;
    [HideInInspector] public int maxHealth = 100;

    [Header("Character Description")]
    [SerializeField] private string characterName = "Unity";
    [SerializeField] private string characterDescription = "Unity Attributes";
}
//Space
To further group variables in the inspector, let's also add in a space between the health and damage stats using the Space attribute.
using UnityEngine;

public class ExampleScript : MonoBehaviour
{
    [Header("Character Stats")]
    [SerializeField] private float damageDealt = 5;

    [Space(20)]

    [SerializeField] private int currentHealth = 50;
    [HideInInspector] public int maxHealth = 100;

    [Header("Character Description")]
    [SerializeField] private string characterName = "Unity";
    [SerializeField] private string characterDescription = "Unity Attributes";
}
//Tooltip
Variable naming is difficult and sometimes variables just need more context. To help with this, we can use the Tooltip attribute so that when you hover over a variable in the inspector, more context about it shows.
using UnityEngine;

public class ExampleScript : MonoBehaviour
{
    [Header("Character Stats")]
    [SerializeField]
    [Tooltip("The damage dealt by the character")]
    private float damageDealt = 5;

    [Space(20)]

    [SerializeField] private int currentHealth = 50;
    [HideInInspector] public int maxHealth = 100;

    [Header("Character Description")]
    [SerializeField] private string characterName = "Unity";
    [SerializeField] private string characterDescription = "Unity Attributes";
}
Inspector Tooltip demo
//Range
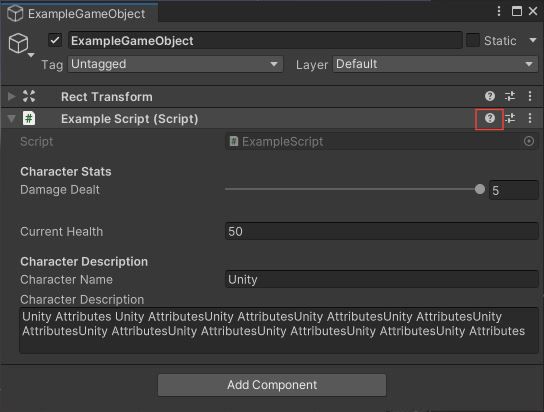
Aside from putting in raw numeric values in the inspector, we can also use the Range attribute to provide us a slider, which gives us more control over the input and prevent invalid values.
using UnityEngine;

public class ExampleScript : MonoBehaviour
{
    [Header("Character Stats")]
    [SerializeField]
    [Tooltip("The damage dealt by the character")]
    [Range(0f, 5f)]
    private float damageDealt = 5;

    [Space(20)]

    [SerializeField] private int currentHealth = 50;
    [HideInInspector] public int maxHealth = 100;

    [Header("Character Description")]
    [SerializeField] private string characterName = "Unity";
    [SerializeField] private string characterDescription = "Unity Attributes";
}
Inspector Tooltip demo
//TextArea
With the string variables, we can do much better as well by providing a larger text area in the inspector, making it easier to edit and manage longer text content.
using UnityEngine;

public class ExampleScript : MonoBehaviour
{
    [Header("Character Stats")]
    [SerializeField]
    [Tooltip("The damage dealt by the character")]
    [Range(0f, 5f)]
    private float damageDealt = 5;

    [Space(20)]

    [SerializeField] private int currentHealth = 50;
    [HideInInspector] public int maxHealth = 100;

    [Header("Character Description")]
    [SerializeField] private string characterName = "Unity";

    [SerializeField]
    [TextArea]
    private string characterDescription= "Unity Attributes";
}
Inspector TextArea view
//HelpURL
This next attribute, the HelpURL, is useful in team projects. With it, you make it easier to access documentation through a link you provide.
using UnityEngine;

[HelpURL("https://www.renz.is/useful-unity-attributes-for-better-inspector-experience/")]
public class ExampleScript : MonoBehaviour
{
    [Header("Character Stats")]
    [SerializeField]
    [Tooltip("The damage dealt by the character")]
    [Range(0f, 5f)]
    private float damageDealt = 5;

    [Space(20)]

    [SerializeField] private int currentHealth = 50;
    [HideInInspector] public int maxHealth = 100;

    [Header("Character Description")]
    [SerializeField] private string characterName = "Unity";

    [SerializeField]
    [TextArea]
    private string characterDescription= "Unity Attributes";
}
//RequireComponent
Now, when a script is going to be using a specific component, the RequireComponent attribute is helpful in making sure that this specific component is assigned to the gameobject. Not only that, but it also won't allow the component to be removed from the object.
using UnityEngine;

[HelpURL("https://docs.unity.com/ScriptReference/Rigidbody.html")]
[RequireComponent(typeof(Rigidbody))]
public class ExampleScript : MonoBehaviour
{
    [Header("Character Stats")]
    [SerializeField]
    [Tooltip("The damage dealt by the character")]
    [Range(0f, 5f)]
    private float damageDealt = 5;

    [Space(20)]

    [SerializeField] private int currentHealth = 50;
    [HideInInspector] public int maxHealth = 100;

    [Header("Character Description")]
    [SerializeField] private string characterName = "Unity";

    [SerializeField]
    [TextArea]
    private string characterDescription= "Unity Attributes";
}

RequireComponent attribute demo preventing the removal of the specified required component
//ContextMenuItem
By adding the ContextMenuItem attribute in a variable, you will be able to right click this variable in the inspector and run a function you specify.
using UnityEngine;

[HelpURL("https://docs.unity.com/ScriptReference/Rigidbody.html")]
[RequireComponent(typeof(Rigidbody))]
public class ExampleScript : MonoBehaviour
{
    [Header("Character Stats")]
    [SerializeField]
    [Tooltip("The damage dealt by the character")]
    [Range(0f, 5f)]
    private float damageDealt = 5;

    [Space(20)]

    [SerializeField]
    [ContextMenuItem("Reset current health", "ResetCurrentHealth")]
    private int currentHealth = 50;

    [HideInInspector] public int maxHealth = 100;

    [Header("Character Description")]
    [SerializeField] private string characterName = "Unity";

    [SerializeField]
    [TextArea]
    private string characterDescription= "Unity Attributes";

    private void ResetCurrentHealth()
    {
        currentHealth = 100;
    }
}
Inspector ContextMenuItem demo
//ContextMenu
To conclude, the ContextMenu works the same way as the ContextMenuItem. It provides you access to run a function you again specify when you right click the script component in the inspector.
using UnityEngine;

[HelpURL("https://docs.unity.com/ScriptReference/Rigidbody.html")]
[RequireComponent(typeof(Rigidbody))]
public class ExampleScript : MonoBehaviour
{
    [Header("Character Stats")]
    [SerializeField]
    [Tooltip("The damage dealt by the character")]
    [Range(0f, 5f)]
    private float damageDealt = 5;

    [Space(20)]

    [SerializeField]
    [ContextMenuItem("Reset current health", "ResetCurrentHealth")]
    private int currentHealth = 50;

    [HideInInspector] public int maxHealth = 100;

    [Header("Character Description")]
    [SerializeField] private string characterName = "Unity";

    [SerializeField]
    [TextArea]
    private string characterDescription= "Unity Attributes";

    private void ResetCurrentHealth()
    {
        currentHealth = 100;
    }

    [ContextMenu("Goodbye")]
    private void Goodbye()
    {
        Debug.Log("Goodbye now! Hope it helped.");
    }
}
ContextMenu inspector demo
Hope it helps!
 RENZ
RENZ
Click to learn more about game development!
//Video Version
//Supporters
Special thank you shout out to the following ongoing generous supporters of my work.
- Laura Milligan
- Jacob Huang
- Andrew Abrook
- Faiz Prasla
- Armaigne Rivero
- Joshua Ravasco